

The Starla jumpsuit features a large back yoke. In this hack, we'll modify the pattern to create a smaller yoke.
There are a lot of alterations to make. We recommend following our tips for backless designs to preserve the airy feel of this jumpsuit.
However, if you’d like to raise the neckline, this hack is for you!
This modification requires moving the back zipper to the right-side seam of the jumpsuit. The length of the zipper remains unchanged.
To create the dart, we'll also make two notches on the back piece.

Step 1—Redraw the pattern pieces
The pieces to be altered are: the back + the back facing
TRACE THE PIECE No. 2 – BACK
1- Tape the back piece to pattern paper.
2- Determine the length of the drop:
Draw a horizontal line 2.5 cm above the bottom of the armhole (see the purple line in the diagram). This line marks the bottom of the new drop.
3- Redraw the drop
Starting from the notch near the neckline, draw a vertical line down to the waist (see the pink line in the diagram).
Draw a second vertical line 1 cm below the first one, stopping at the horizontal line (the blue line in the diagram).
Make a mark one notch in the middle of the blue line.
Redraw the teardrop by connecting the notch at the neckline, the middle notch on the blue line, and the bottom of the teardrop (red line in the diagram).

4– Create the back pattern piece.
We're going to divide the back into two pieces: 2a—Upper Back and 2b—Lower Back.
Cut the back piece in half along the horizontal purple line you drew earlier.
Add a 1-cm seam allowance to the two pieces you've just created:
- 1 cm at the bottom of Figure 2a,
- 1 cm at the top of problem 2b.

TRACE THE PART No. 4 – BACK PANEL
1- Tape piece 2a onto pattern paper.
2- Place the back facing on piece 2a, aligning the neckline and the notch. Secure with tape.
3- Trace the back facing:
On the facing, mark the bottom edge of piece 2a (purple line on the diagram).
Trace the outline of the new facing onto paper as shown in the diagram (see the red dotted line).
Be sure to mark the notch on the new trim piece.

Step 2—Adjust the fit of the wetsuit
You can now pick up the sewing booklet.
- Follow the instructions in your sewing booklet through Step 2.
- In Step 3, follow the instructions in the booklet, replacing part 2 with part 2a.
- Continue following the sewing instructions through step 7, inclusive. Note: We haven't sewn the lower back (piece 2b) yet—that's normal!
- Before moving on to Step 8, we'll shape the back.
Overlock the center back seams of pieces 2b (see the blue line on the diagram).

Sew right sides together along the center back line, 1 cm from the edge.
Press the seam open.

Sew the top and bottom back pieces right sides together, as shown in the diagram.
Neaten the seam allowance and press it down.
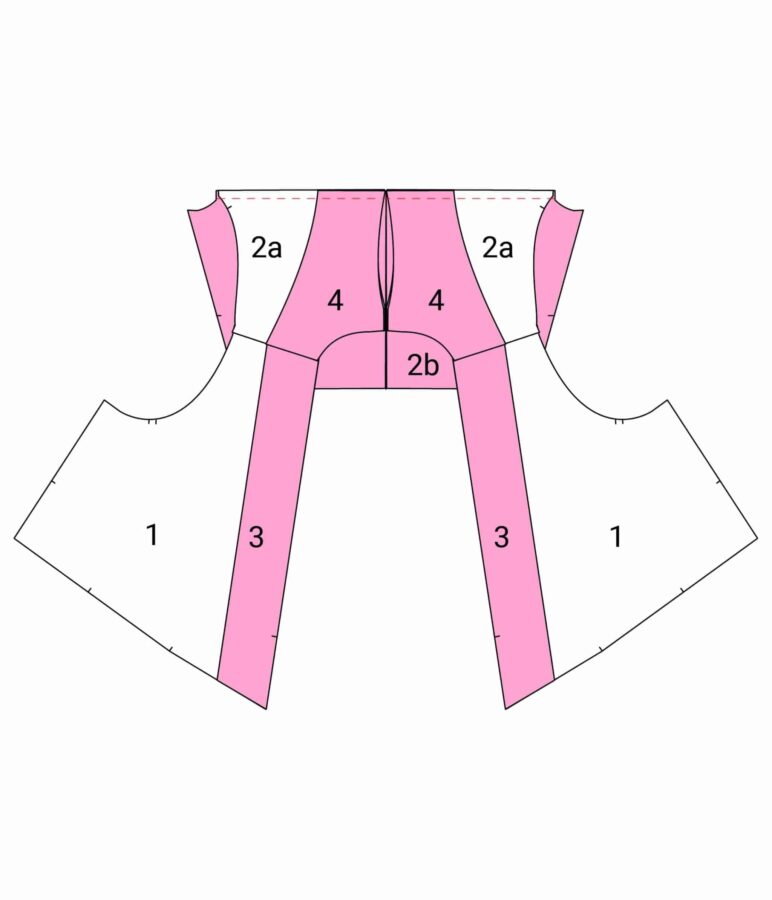
- In Step 8.1, sew the back side seams up to the waist (ignore the old zipper notch).
Next, open up the seam with an iron.

- Then proceed directly to step 8.3 (the zipper will be sewn onto the side later).
Sew two continuous rows of gathers, ignoring the instructions regarding the zipper.
Gather the back of the shorts according to the instructions in the booklet.

- In Step 8.4, sew the back and the back shorts right sides together, aligning the edges and the center seams. Ignore the instructions regarding the facings and the zipper.

- In Step 9, first and foremost, serge the sides of the jumpsuit.
Next, we'll position the zipper teeth as shown in blue on the diagram:
- 8 cm below the waist seam on the back of the shorts
- 12 cm above the waist seam on the back for sizes 34–48
- 17 cm above the waist seam on the back for sizes 50–58
Next, pin the belt to the front as shown in the booklet.
Pin the front and back pieces together, right sides facing, along the sides, making sure the seams and notches line up.
Sew as shown in the diagram, making a secure bar tack at the zipper notch at the bottom of the jumpsuit.
Finally, press the seam allowances open with an iron.

Now we're going to sew in the invisible zipper:
Sew the zipper onto the jumpsuit, positioning the top of the zipper at the top zipper notch (for sewing the zipper, refer to the detailed instructions in step 8.2 of the booklet).
Next, we'll finish closing up the sides:
Pin the side of the jumpsuit to the top of the zipper, right sides together.
Stitch 1 cm from the edge, avoiding the zipper, and stop 2 mm from the zipper seam. This seam can be difficult to sew. If you have trouble, sew as close to the zipper as possible, then finish the seam by hand.
We've taken care of all the pattern adjustments— all you have to do now is follow the sewing instructions all the way to the end!